Are you READY!!!! Let’s bust out your homework and slap these babies on!!!!
If you are reading this for the first time… Then you really need to catch up with the class and read the last two posts.
I say let’s go BIG and start with the strip lashes. Now you should have some form of strip lash in front of you. I recommend using a clear strip on the lash but, anything you purchased will work. You will also need lash glue, Duo is my favorite but, anything will do for this purpose and don’t forget the tweezers.
REMEMBER! The name of the game today is just to get them your eyes to where you feel comfortable.
Rules of the Game:
1. Do not attempt to put strip falsies on when you are in a rush. This will not end well for you. I recommend doing this over a weekend (or your days off) so you are not rushed and can take your time.
2. Promise me that you won’t give up. PROMISE!!! You have to keep trying, giving up won’t help a damn thing! Didn’t your mother tell you that practice makes perfect. Well…….
3. Getting the lashes on on your eyes to where they are comfortable (regardless of placement) constitutes a win. I will show you a trick that will cover up imperfect falsie placement.
I think we are ready.
For all of my Virgin Falsie Peeps out there these steps are for you.
Have your primer and foundation already applied…
1. Remove the falsies from the packaging with the tweezers. Be Gentle! I like to pick a corner of the lash and pull for the strip part NOT, lash.
2. Gently lay it across your eye. You do not need glue for this nor need it placed right. You just want to make sure the length is right for your eye. If the lashes are too long just trim the longer end, to the correct length.
3. Now set them down for a sec and coat your natural eyelashes in mascara. I recommend to only do one coat. You don’t need to get crazy with it, you just want to make sure the naturals blend with the falsies.
4. Glue Time! Using tweezers, take the lashes in the middle and run a very thin ribbon of glue across the strip. Making sure the ends are both fully covered

– If you are using glue that comes in a tube. I like to put a small dot of glue on the plastic cover, that the lashes came in and, use a Qtip to apply.
– If you are using the glue that comes in an applicator then use the paint brush end to run a thin line across the strip.
5. Let the glue sit for about 3-5 seconds. If you are using a beauty mirror then you will want to use the magnifying side for the actual placement.
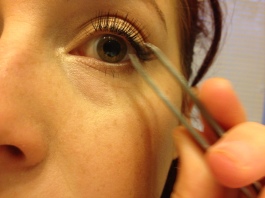
6. Gently place the lashes in the center of your lid, as close to the lash line as possible.
7. Use the tweezers to gently shift the lashes to the right or left to make sure the ends are secure. Feel free to turn the tweezers over and use the flat edge to push the lashes into your lash line.
** If you can’t get them placed where you want them, don’t freak. Simply take them off and reapply glue and try again. If you find that you are on your fourth or fifth time trying AGAIN don’t panic, simply pour yourself a glass of wine and try again. I think it took me over ten times my first try!!!
8. Once you have them where you want them, you want to sandwich the falsies with your real lashes between the tweezers and press. BE CAREFUL TO NOT PINCH YOUR DANG SKIN HERE!!!! But this will help to secure them to your lash and give the natural look.
The reason why I didn’t have you apply any eyeshadow or eyeliner to your eye, is so you could really see your lash line when applying.
Now if you don’t have the most perfect placement but, you can live with them then, it’s time to touch up. Do your eyeshadow like you want and then run some eyeliner over the seam of the falsies. This will help hide any imperfect placement.

Are they on? Do you look fabulous? I bet you Do!!!! But more importantly how do you feel?
Now that you have conquered strip lashes individual lashes are going to see childs play, lol!
Let’s do this!
Same rules apply here except this time I want you do do entire face, foundation, eyeshadow, eyeliner, mascara everything.
1. Remove the lash using tweezers.
3. Glue Time!
– If you are using glue that comes in a tube. I like to put a small dot of glue on the plasict cover that the lashes came in and dip the end into the glue.
– If you are using the glue that comes in an applicator then use the paint brush end, and place a pin size dot on the end of the lash.
3. Place the lash at the very end of the eye, so you can get the winged out affect.
4. Now do the same for the other eye.
5. Coming back to the first eye, you want to place the second lash near the first. They don’t need to be right next to each other, just close. Repeat on the second eye.
6. Now stop here and take a look, do you like what you see? Or do you need three on each end of your eye. If so, do that…..
So I know there is two different lightings here (not sure what was going on) but, you can see in the second pic that the ends of my lashes have a subtle umpf to them.


Please! Please! Please! Send me pics of you guys rocking your new Bad ASS falsies!!!! I love seeing your faces 🙂
Here’s my Two Cents, You Keep the Change!
